How to brew beer at home with a kit
To brew beer at home with a kit, clean and sanitize your equipment, prepare the wort, add yeast at the recommended temperature, ferment under temperature control, then bottle and condition according to the instructions.
Research-based article drawn from our 30 home brewing reviews. Updated September 2026.
Short answer
To brew beer at home with a kit, follow its recipe to prepare wort, the sugary liquid yeast turns into beer. Clean and sanitize equipment, cool the wort to the yeast’s recommended pitching temperature, add yeast, and ferment within its specified temperature range. Confirm fermentation is complete before adding measured priming sugar and bottling, then condition as directed.
Our picks for “how to brew beer at home with a kit”
- 1
 Mr. Beer - Craft Beer Making Kit (2 Gallon) Complete DIY Home Brew Set | Beer Making Kit for Beginners Everything Included | Reusable 25 oz Bottles | 2 Gallon Keg | Golden Ale4.4$59.95Our score 6.6/10
 - 2
 Govee Indoor Hygrometer Thermometer H5075 with Bluetooth App Control4.5$12.99Our score 8.2/10
 - 3
 American Cream Ale Homebrew Beer Ingredient Kit4.5$46.79Our score 7.7/10
 - 4
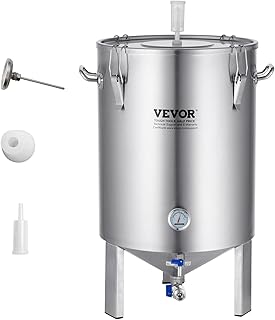 VEVOR Fermentation Tank 16 Gal,Stainless Steel Beer Brew Fermentor, Brew Bucket Fermentor for Home Brewing with Conical Base Brewing Equipment4.2$184.90Our score 7.6/10
1. Choose a starter kit, not just an ingredient refill
Start by checking whether your kit includes brewing equipment or only ingredients. Match the recipe’s batch size to your fermenter and leave the headspace specified in the instructions. Before brew day, read the entire manual and inventory the fermenter, closure or airlock, transfer equipment, bottles, cleaner, sanitizer, and any required measuring tools. Depending on the recipe, you may also need a suitable pot and a way to cool the wort.
The Mr. Beer Craft Beer Making Kit is a two-gallon starter option with a fermenter and reusable 25-ounce bottling equipment. It suits beginners trying the hobby with limited space, but its thin plastic vessel provides little thermal buffering. Plan your fermentation location before choosing a convenient kitchen corner.
By contrast, the American Cream Ale Homebrew Beer Ingredient Kit contains pre-measured ingredients for standard five-gallon brewing setups, not fermenters, siphons, tubing, or sanitizing agents. It makes sense for an already equipped brewer, not as a standalone first purchase. Neither convenience nor recipe choice replaces a stable fermentation temperature.
Read the reviews: Mr. Beer, American Cream Ale Homebrew Beer Ingredient Kit
2. Clean, sanitize, and prepare the wort
Cleaning and sanitizing are separate jobs. First remove visible residue with a cleaner appropriate for your equipment, then sanitize surfaces that will touch cooled wort or beer. Follow the chemical label for dilution, contact time, and whether rinsing is required. Check your equipment manual for material compatibility rather than assuming one chemical or water temperature suits everything.
Our buying rule is to buy twice the cleaning supplies you think you need. Stock sanitizer separately, too; a small starter allotment should not determine how thoroughly you prepare. Include lids, utensils, transfer tubing, and sampling tools in your sanitation plan.
Prepare the wort exactly as your recipe directs. Some kits use prepared extract, while others require steeping, boiling, or timed additions; do not substitute a generic schedule for the supplied instructions. Use the specified water volume and cool the wort to the yeast’s recommended pitching temperature before adding yeast. Keep equipment contacting cooled wort sanitized. Handle hot pots carefully, and avoid sudden temperature changes in glass vessels.
3. Make fermentation temperature your first priority
Fermentation temperature control outranks every ingredient choice. Use the yeast’s specified range rather than a universal room-temperature target. Active fermentation produces heat, so the surrounding air can be cooler than the beer itself. Keep the fermenter protected from light, provide the venting arrangement required by its manual, and never seal active fermentation in an unvented vessel.
The Govee Indoor Hygrometer Thermometer H5075 records ambient temperature history over Bluetooth, helping you spot overnight swings without opening a fermentation cabinet. It does not measure liquid temperature and has no submersion probe. Treat it as a diagnostic aid, not a controller or a substitute for an appropriate beer-temperature measurement method.
Choose a location or cooling arrangement that can maintain the required range before pitching yeast. Where equipment uses external temperature controls, follow the relevant manuals for installation and probe placement. Track fermentation with sanitized gravity samples as your instructions direct. Airlock bubbling alone cannot establish that the beer is ready to package; confirm stable gravity readings over the interval recommended by the recipe.
Read the reviews: Govee Indoor Hygrometer Thermometer H5075 with Bluetooth App
4. Bottle safely, then upgrade the messy steps
Once fermentation is complete, clean and sanitize your bottles, closures, and transfer equipment. Use bottles intended for carbonated beer, inspect them for damage, and measure priming sugar according to the recipe and actual volume being packaged. Guessing the dose or bottling unfinished fermentation can create dangerous pressure. Transfer gently to limit splashing and follow the kit’s instructions for filling and sealing.
Condition the bottles at the specified temperature for the recommended period, then chill before serving. Brew-day preparation is not the same as time until drinkable beer; fermentation and bottle conditioning are separate stages. Keep notes on temperatures, gravity readings, and packaging so you can repeat the process.
Upgrade only after identifying the task you want to simplify. Stainless conical fermenters simplify messy sediment handling: the VEVOR 16-gallon fermentation tank has a conical bottom for trub dumping without transfers. Its size, space requirements, and need for active cooling make it a large-batch upgrade rather than a proportionate first purchase for a two-gallon kit. Secure temperature control and adequate cleaning supplies first.
Read the reviews: VEVOR Fermentation Tank 16 Gal
Frequently asked
- How long does it take to brew beer with a kit?
- Allow time for wort preparation, fermentation, and bottle conditioning rather than treating brew day as the whole process. The schedule depends on the recipe, yeast, and temperature. Follow the kit’s instructions, confirm fermentation is complete with stable gravity readings, and allow the specified conditioning period before chilling and serving.
- Can I ferment a beer kit at room temperature?
- Only if that location keeps the beer within the yeast’s recommended temperature range. Room air is not the same as fermenting beer, which generates heat. Monitor conditions and use cooling or heating as needed. Check your kit instructions for the target range and equipment manuals for compatible temperature-control methods.
- Do I need to boil the wort for every beer kit?
- No single boiling procedure applies to every kit. Follow your recipe’s directions for prepared extract, steeping, boiling, and ingredient additions rather than borrowing another kit’s method. Whatever the preparation process, equipment touching cooled wort must be sanitized, and yeast should be added only at its recommended pitching temperature.
- How do I know when my beer is ready to bottle?
- Use gravity measurements taken with sanitized sampling equipment and confirm that readings remain stable over the interval specified by your recipe. Do not rely only on elapsed days or a quiet airlock. Packaging before fermentation finishes, or adding excessive priming sugar, can cause dangerous pressure in sealed bottles.